This article assumes that you have some basic knowledge of Microsoft Windows, Microsoft Dynamics CRM data fields and data fields provided by InsideView.
Important Notes:
- Back up your CRM data before following the steps in this article.
- You can upload data into Microsoft Dynamics CRM in multiple ways. The steps to upload data may differ based on the procedure you choose to follow.
- If you are unable to upload data even after following the steps below, then send an email to support@insideview.com for assistance.
To upload data using a Microsoft Dynamics template, follow these steps:
| Step | Description | Details |
|---|---|---|
| 1 | Log in | Log into Microsoft Dynamics CRM. |
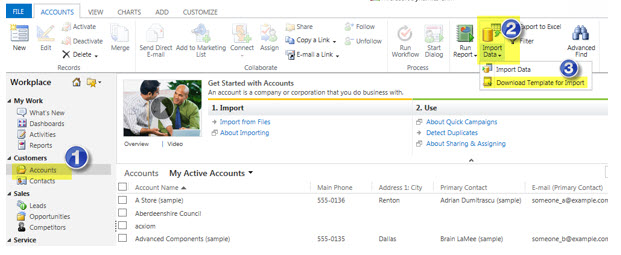
| 2 | Download the template for import | Click on Account > Import Data > Download Template for Import as illustrated below:
|
| 3 | Save the file | Save Account.xml in a desired location and open the file using Microsoft Excel. |
| 4 | Map data columns | Map InsideView data columns with Microsoft Dynamics CRM columns in Accounts.xml. The mapped template with data fields will look like the screenshot below:
|
| 5 | Save the file |
Save the file. Click Yes on the warning message and close the file. Note: Microsoft Dynamics CRM template and this document covers standard columns. If you have any custom columns for your version of Microsoft Dynamics CRM, adjust your data mapping accordingly. |
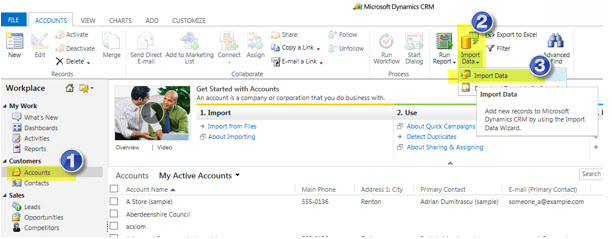
| 6 | Import data | On the Microsoft Dynamics CRM window, click Accounts > Import Data > Import Data. The Import Data Wizard window opens.
|
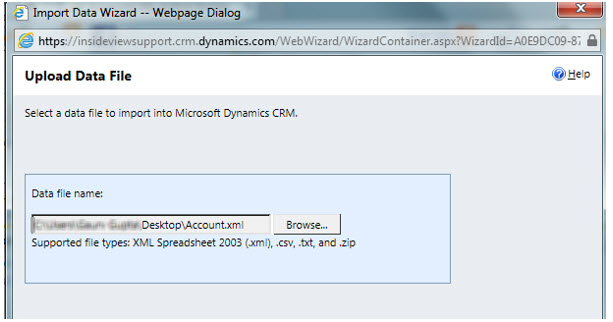
| 7 | Select the file | Select the file Account.xml from the location where you saved and last updated it and click Next.
|
| 8 | Review field mappings | On the Review Mapping window, accept the default mapping without changes, because you have used a Microsoft Dynamics CRM template. The system will automatically align your file with Account (Record Type) and will also align all columns.
|
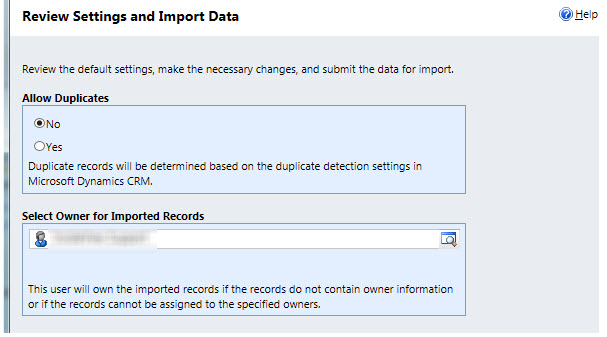
| 9 | Review and import data | On the Review Setting and Import Data window, in the Allow Duplicates region, accept the default selection as No. Leave this selection as it is unless you want separate entries for newly imported data.
Note: Duplicate records are checked based on the Duplicate Detection settings and rules for your Microsoft Dynamics CRM. These settings are found at MSD > Settings > System – Data Management.
|
| 10 | Check import status | Click Next on the window above.
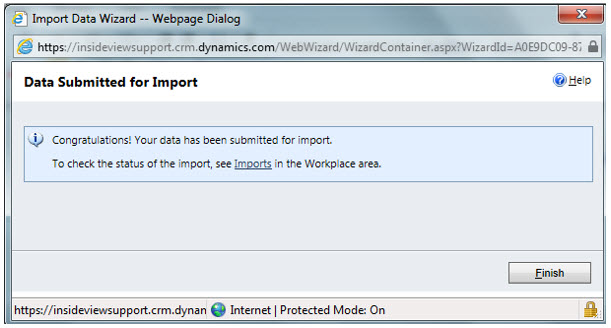
A Congratulations message is displayed on the Data Submitted for Import window. You can review the imported data now by clicking on the Import hyperlink on this window or Navigate to MSD > Settings > System – Data Management > Imports to review the import status.
|
| 11 | Complete upload process | Click Finish. |
