Installing Insideview Enrich in your Microsoft Dynamics CRM is an easy process. This article outlines the procedure to complete your installation for Microsoft Dynamics CRM.
Note: If your organization restricts network access to third-party applications, please ask your IT administrator to add the following IP address ranges to allow updates from InsideView:
-
52.4.63.192 to 52.4.63.223
-
64.56.203.0 to 64.56.203.255
Sign up for InsideView Enrich
| Step | Description | Details |
|---|---|---|
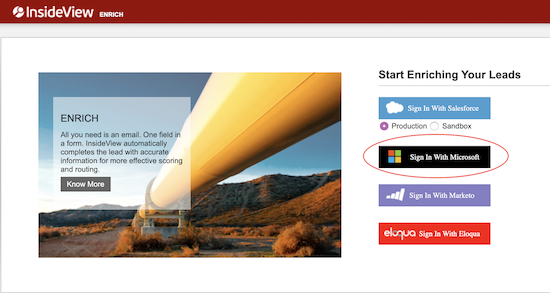
| 1 | Go to the Sign-Up page | Go to the InsideView Enrich sign-up webpage: https://marketing.insideview.com/marketing/admin/signin, and then click Microsoft Dynamics.
|
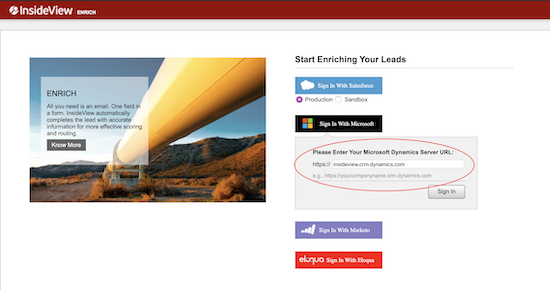
| 2 | Enter your Microsoft Dynamics URL | Enter the URL for your Windows Azure organizational account.
For example, the Microsoft Dynamics CRM URL can follow this convention: https://yourcompanyname.crm.dynamics.com
|
| 3 | Log in to Windows Azure account | Sign in to Windows Azure with your organizational account.
|
| 4 | Accept | Click Accept.
A webpage appears confirming that you have successfully signed up for InsideView Enrich with a new account in Authorization Pending status. |
Download the InsideView Enrich Solution Package
| Step | Description | Details |
|---|---|---|
| 1 | Read the instruction article and download the Insideview Enrich Solution Package |
Once your account is authorized, download the InsideView Enrich solution package. InsideView Enrich - Microsoft Dynamics CRM Online Versions:
|
| 2 | Review Solution Package contents |
The InsideView Enrich solution package will automatically save to your downloads folder. The file is a compressed (.zip) file that includes the following components:
|
Import the InsideView Enrich solution
Important: All unmanaged solutions must be backed up before importing InsideView Enrich into CRM.
To import InsideView Enrich solution package into CRM, follow these steps:
| Step | Description | Details |
|---|---|---|
| 1 | Sign in with your administrative credentials | Make sure you're signed into Microsoft Dynamics CRM as an administrator. |
| 2 | Go to the Settings page | On the navigation bar, click Microsoft Dynamics CRM and then select Settings.
|
| 3 | Select the Solutions link | Under Settings, click Solutions.
|
| 4 | Go to the Import page | On the Actions toolbar, click Import. 
|
| 5 | Browse the location of the package file | To browse to the InsideView for Marketing solution package you have downloaded, click Browse.
or In the text box next to the Browse button, type the complete path to InsideViewForMarketing_1_0_managed.zip file. |
| 6 | Go to next | Click Next. |
| 7 | View the solution package details | After the file is processed, you can click View solution package details to see a list of the solution components that were imported, and then click Next.
|
| 8 | Import the solution package | On the Import Options page, click Import.
When the solution import is done, a message appears notifying you if it was successful. If any of the items could not be processed successfully, the dialog box displays error messages.
|
| 9 | Ignore the warning message | Please ignore the following warning message during import and click Close.
|
Configure field mapping between InsideView and your CRM
The standard fields in InsideView Enrich are automatically mapped to the relevant fields in your CRM. However, you can customize the automapping as per your requirements. You can also overwrite the data on some of the fields in your CRM records with the data in InsideView Enrich.
Follow these steps to configure the field mapping:
| Step | Description | Details |
|---|---|---|
| 1 | Go to the Sign-up page | Open the InsideView Enrich Sign Up webpage: http://marketing.insideview.com/marketing, and then click Microsoft Dynamics. |
| 2 | Sign in to your Windows Azure account | Sign in to Windows Azure with your organizational account. |
| 3 | Grant access | Click Grant Access. You are taken to the InsideView Enrich dashboard. |
| 4 | Select the Custom Field Mapping tab | On the dashboard, click the Custom Field Mapping tab. 
|
| 5 | Modify CRM field mappings | To modify the CRM field mapped to an InsideView for Marketing field, click the search icon next to the CRM field. |
| 6 | Search for CRM fields |
On the CRM Fields dialog, search for the relevant CRM fields and click the one you want to map the selected InsideView for Marketing field.
|
| 7 | Select the Overwrite Existing option | If you want IV for Marketing to overwrite the existing data in your CRM records for a particular field, click the Overwrite existing checkbox next to the field.
Note: The Overwrite Existing checkbox will work only with the default mappings. |
Important Note: InsideView Enrich uses an access and a refresh token from your Microsoft Dynamics CRM user session to enrich the lead data. By default, Microsoft Azure AD refresh tokens are valid for 14 days. This means as long as you refresh these tokens by signing into your Microsoft Dynamics CRM, InsideView Enrich can use the remote access authorization token and there is no need to re-authenticate a valid token.
However, if there is no activity in your CRM or InsideView Enrich for 14 days, InsideView Enrich no longer uses the access and refresh token to enrich the lead data. The following email notification is sent to users:

To avoid this problem, you must either create a lead in Microsoft Dynamics CRM within 14 days.


