You can use the Data Loader to import company data in Salesforce CRM. InsideView recommends you to follow these guidelines to determine which method best suits your business needs:
Use Data Loader when:
You need to load/import 50,000 to 5,000,000 records. Data Loader is supported for loads of up to 5 million records. If you need to load more than 5 million records, InsideView recommends you work with a Salesforce partner or visit the AppExchange for a suitable partner product.
Use the import wizards when:
- You are loading less than 50,000 records.
- The object you need to import is supported by import wizards. To see what import wizards are available and thus what objects they support, from Setup, enter Data Management in the Quick Find box, then select Data Management.
- You want to prevent duplicates by uploading records according to account name and site, contact email address, or lead email address.
For more information about the import wizards, see Import Data Into Salesforce.
Important Notes:
- Back up your CRM data before following the steps in this article.
- You can upload data into Salesforce CRM in multiple ways. The steps to upload data may differ based on the procedure you choose to follow.
- If you are unable to upload data even after following the steps below, then send an email to support@insideview.com for assistance.
| Step | Description | Details |
|---|---|---|
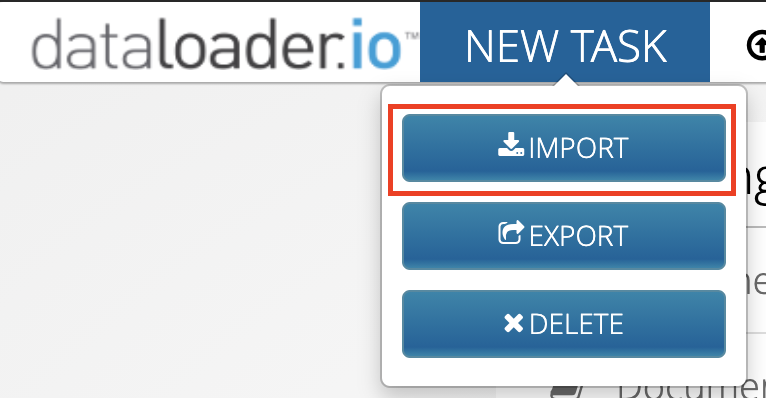
| 1 | Launch Data Loader Tool | Launch Data Loader Tool for Salesforce CRM and login with Admin user credentials with OAuth permissions. In the New Task menu click Import.
|
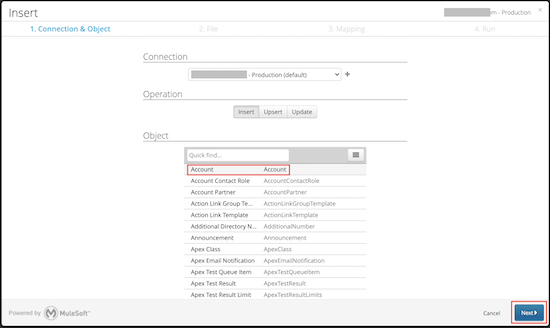
| 2 | Select the Account link | In the Import dialog, select Accounts and click Next.
|
Step 1: Import Ultimate Parent Companies
| Step | Description | Details |
|---|---|---|
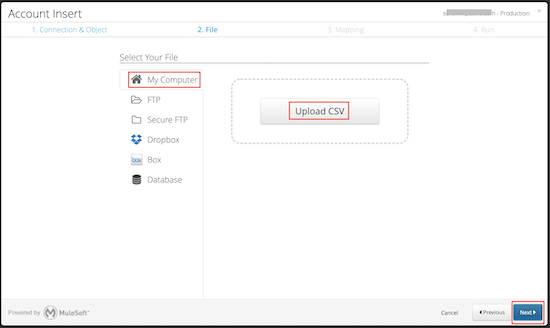
| 1 | Import the file | To import the Upload1_Ultimate Parents.csv file, click Upload CSV and select the comma-separated value (CSV) file.
|
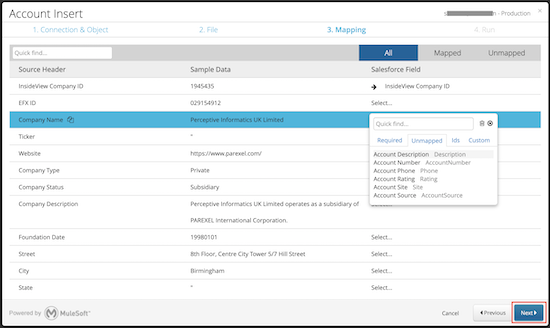
| 2 | Map the fields | In the next screen map the fields in the CSV file to the corresponding Salesforce CRM fields and click Next.
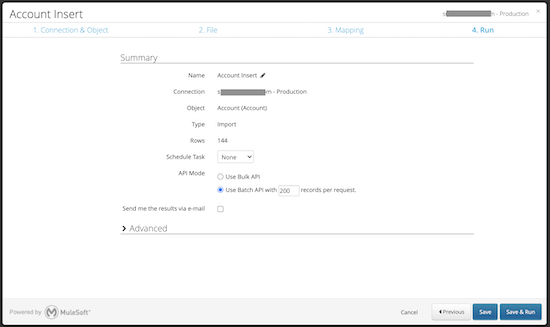
Review the summary and verify the number of records being imported into Salesforce.
Click Save & Run. |
| 3 | Review the progress | You will be redirected to the All Tasks page, where you can view the progress on the import task. Once the import is complete, a message appears showing the number of records succeeded. Ensure that there are ‘0’ errors.
|
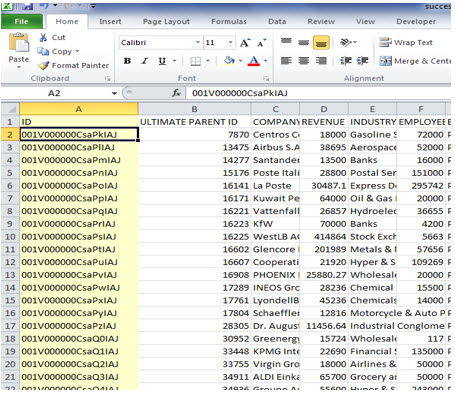
| 4 | View the success log | Click Successes and a copy of the success and error files will be downloaded to your computer. The file contains an “ID” column generated in Salesforce for the inserted records.
|
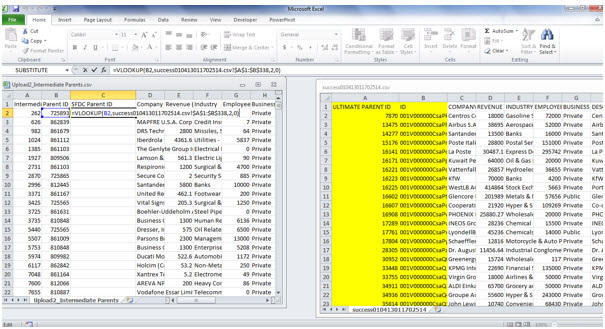
| 5 | Map the generated IDs | These generated ID’s should be mapped in the file Upload2_Intermediate Parents.csv in the column Salesforce Parent ID based on the Ultimate Parent ID (Column B) available in the success file. Please use VLOOKUP formula in Excel to do this.
|
| 6 | Save and close the CSV file. | Save and close the Upload2_Intermediate Parents.csv file after mapping the Salesforce Parent ID. |
Step 2: Import Intermediate Parent Companies
| Step | Description | Details |
|---|---|---|
| 1 | Import the intermediate parents file | Once the Salesforce Parent ID’s are mapped in the Upload2_Intermediate Parents.csv, import this file into Salesforce using the Import option in Data Loader tool. Follow same process in steps 1 in the previous section. |
| 2 | Map the fields |
On the map field screen, map the fields in the CSV to corresponding fields in Salesforce CRM. Ensure that the field mapping is same as the one done during the previous file upload. The Salesforce Parent ID should be mapped to the Parent Account ID field in Salesforce, so that the Family Tree relation is built in Salesforce.
|
| 3 | Follow steps 3 and 4 from the previous section | Follow the same process as described in steps 3 through 4 of of the previous section to open the success file. |
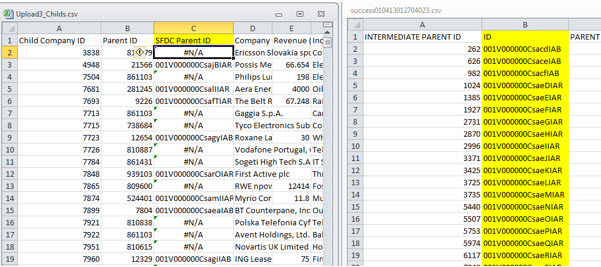
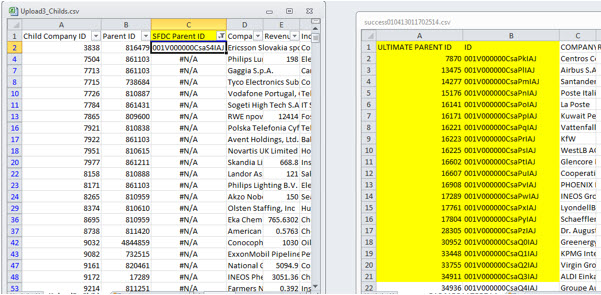
| 4 | Map the generated account IDs | The generated Salesforce Account IDs need to be mapped in the file Upload3_Childs.csv in the column Salesforce Parent ID (Column C), using the Parent ID (column B of Upload3_Childs.csv) and Intermediate parent ID of success file 2. Follow same process described in step 5 of previous section.
|
| 5 | Map the "#N/A" | “#N/A” values correspond to the values that are not found in success file 2. These values can be found using the Ultimate Parent ID values in Success File 1, and by mapping fields for only #N/A values. This is because some companies have the Intermediate Parent ID’s same as Ultimate Parent ID and they were already inserted during Step 1 into Salesforce.
|
| 6 | Proceed to next process | Once the second mapping is done, ensure that there are no “#N/A” values in the csv file. Save and close the file to proceed to Step 3. |
Step 3: Import the Child Companies
| Step | Description | Details |
|---|---|---|
| 1 | Import the child companies file | After the Salesforce Parent ID’s are mapped in the Upload3_Childs.csv file, import this file into Salesforce using the Import option in the Data Loader tool. To import the child companies, follow the same process as described in the previous section, but copy the same field mappings as Step 2 while uploading the file. |
| 2 | Insert child companies | To insert child companies, follow the same process described in Steps 1 and 2. |
| 3 | Save the file. | Once the import is complete, save the success file for reference. In case of any error records, view the error file and correct the errors mentioned in the Error column (only in case of failed records). |
Step 4: Import the Companies without Family Tree
The companies without a family tree relation can be imported directly using the Upload4_wo_FT.csv file as described in Step 1, without the Parent ID mappings.
Step 5: Validate the data
Log into the Salesforce production instance and check randomly for some records to ensure that the family Tree hierarchy is created as illustrated below:

