Creating an Account Management Process with Custom Rules in Microsoft Dynamics CRM

  • Updated

InsideView Data Integrity uses a dynamic account management process to pull account data directly from Microsoft Dynamics CRM integration. As soon as a process runs successfully, you will be able to review the total number of account matches and updates that are processed.

Note: InsideView Data Integrity allows you to receive updates for your Microsoft Dynamics CRM for account, contact and lead objects based on custom rules that you define.

This article provides detailed instructions on how to create a dynamic account management process with custom rules:

Step Description Details
1 Log in to Dynamics Log in to Microsoft Dynamics CRM with your admin user credentials.
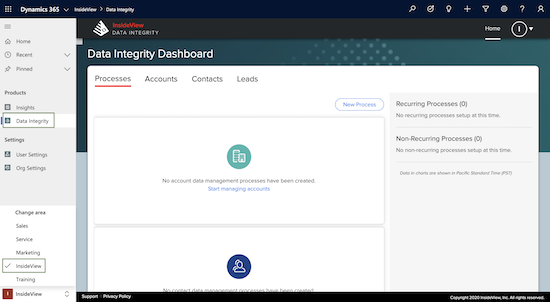
2 Go to the Data Integrity app Open the Data Integrity Dashboard by going to InsideView Products Data Integrity.

1_-_Open_DI_small.png

4 Create a data management process If you are configuring any process for the first time after your Data Integrity account is provisioned, the following screen appears:

DI_New_Setup_small.png

Note: Before creating a data management process, make sure you have configured an Integration for Data Integrity. For information, read the article Setting Up an Integration for Data Integrity in Microsoft Dynamics CRM in our Knowledge Base.

In the Quick Setup card, click Start to create a new process for Accounts, Contacts and Leads object.

Note: If you want to create a process for each object separately, click Start in the Custom Setup card.

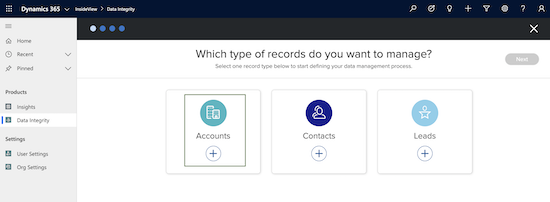
Select the Accounts link. 

2_-_New_Acc_Process_small.png

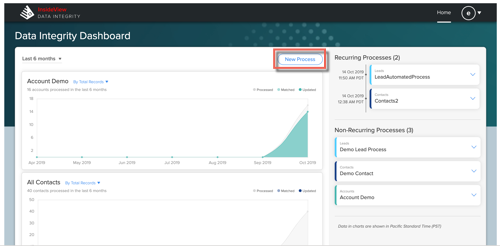
If you have already created a process, click New Process to launch the account management process creation workflow page.

new_process_small.png

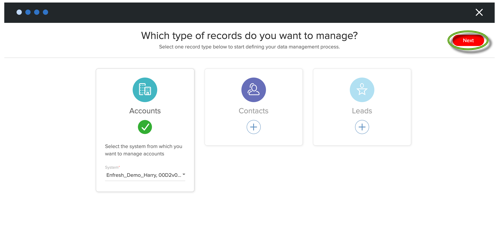
Click Next to create a new account management process.accounts_selected_small.png

Note: InsideView Data Integrity allows you to add criteria only for active accounts.

5 Select the segmentation and frequency Next you can do the following actions:

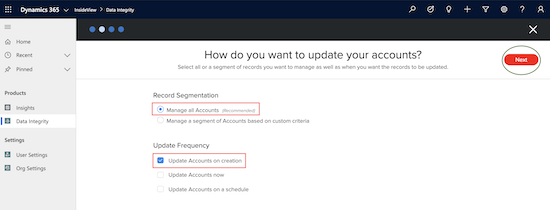
3_-_How_small.png

    • Select the Record Segmentation options:
      • Manage all records (recommended) - When you select this option all accounts in your Microsoft Dynamics CRM are managed and will receive updates from InsideView Data Integrity.
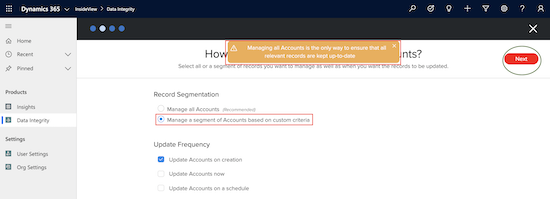
      • Manage a segment of accounts based on custom criteria - When you select this option, you can define custom criteria to manage accounts based on a dynamic rule.

        4_-_Segment_small.png

    • In the Update Frequency area, select the frequency at which you want to run the accounts process to receive updates from InsideView Data Integrity. Select the following frequency options:
      • Update accounts on schedule - When you select this option, you can define a schedule for updating accounts with information from Data Integrity. You can enter the Start Date, Start Time, and Recurring options as Daily, Weekly and Monthly.

        account_update_schedule.png

      Note: InsideView Data Integrity will send update notifications based on the frequency settings to receive them.

In this example, select the Manage a segment of accounts based on custom rules in record segmentation and the Update accounts on schedule frequency option and then click Next.

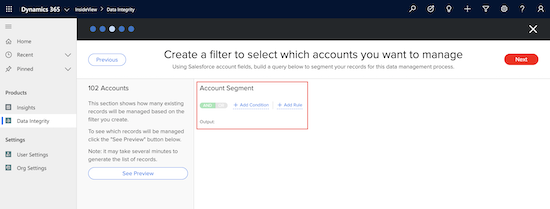
6 Define a custom criteria If Microsoft Dynamics CRM Integration credential matches with CRM organization ID, the Account Segment area appears:

5_-_Create_filter_small.png

You can define custom criteria to manage a segment of accounts by clicking either + Add Condition or + Add Rule.

  • Add Rule – Adds a single rule where you can define the field name, operator, and value(s) you want to use to filter accounts.
  • Add Condition – Adds a set of nested rules to filter accounts based on if and then clauses.
7 Add a condition When you click + Add Condition, enter the following details to define the condition:

dy_list5.png

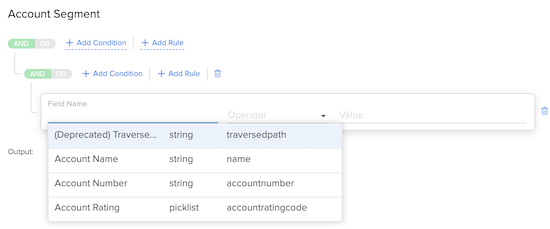
  • Field Name – select any field that you want to use to filter accounts.

    You can select a field that appears in the Field Name options. The Datatype and the corresponding Microsoft Dynamics CRM field name is selected for the field you choose from the list of options. For example, select the Account Name field.

    6_-_Select_Field_small.png

  • Operator – After entering the Field Name, select the appropriate Operator. Below is a list of datatypes and the operators available for each datatype:
    • String: equal, not equal, ends with, starts with, does not start with, does not end with, contains, doesn’t contain, in, not in, is empty, is not empty.
    • Boolean: equal, not equal to, is empty, is not empty.
    • Text area: equal, not equal to, like, not like, starts with, does not starts with, ends with, does not end with.
    • Double/Number: equals, not equal, greater than, greater than or equal, lesser than, lesser than or equal, is empty, is not empty.
    • URL: equal, not equal to, like, not like, starts with, does not starts with, ends with, does not end with.
  • Value – Once you have entered Field Name and selected an Operator, enter the Value for the field criteria. You can also add multiple values by separating them with a comma. To add multiple values, use the IN operator.

Use Case Examples

Here are a few use case examples of filters, showing the different fields used in Microsoft Dynamics CRM with an operator and a sample value:

  • Select the industry field, operator as equal and enter the value as Media. This filter will retrieve all accounts that have an industry type that equals Media.

    dy_list7.png

    Notice that the output of your rule appears at the bottom of the query builder.

  • Select the Created Date field, operator as greater and enter the date as 11/30/2017. This filter will manage only accounts that have a Created Date that starts after November, 30th, 2017.

    dy_list8.png

  • Select the Billing State/Province field, operator as Not equal, and enter the state name such as CA. This filter will retrieve accounts from states other than CA (California).

    dy_list9.png

  • Select the Account Name field, operator as starts with and enter the value as In. This filter fetches accounts that start with In in the account name field in Microsoft Dynamics CRM.

    dy_list10.png

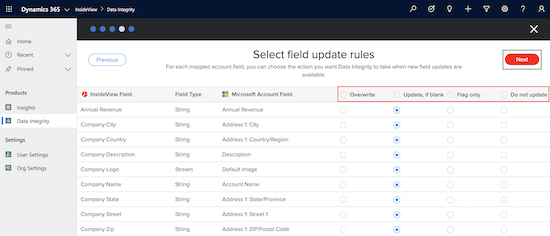
8 Select the account field mappings On the Select field update rules page, some InsideView Data Integrity fields will be mapped to fields in your Microsoft Dynamics CRM by default, as illustrated:

7_-_Field_Update_small.png

You can select the Field Mapping setting for all fields by clicking any of the options at the top of the table or set field-by-field update rules.

For each field, you can choose one of the following options:

  • Overwrite – Always pushes field value updates automatically into your CRM, overwriting your existing values.
  • Update, if blank – Pushes field value updates automatically into your CRM only when the particular field is empty.
  • Flag only – Flags field value updates but does not automatically push them into your CRM. You will receive email notifications based on the frequency settings.
  • Do not update - This option will not send field-level updates for your accounts from Data Integrity.
  • Click Next.
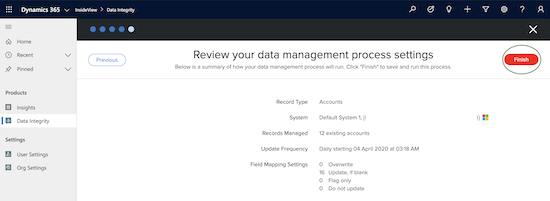
9 Review and complete process On the Review your data management process settings page, you can review your account management process settings and click Finish.

8_-_Review_small.png

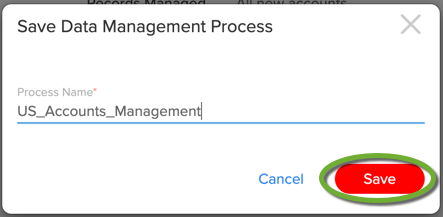
In the Save Data Management Process dialog, enter the name for your process and click Save.

accounts_save.png

For more information, read the article Create an Account Object Process in Microsoft Dynamics CRM in our Knowledge Base.

Note: Follow the same instructions to create a contact and lead management process with custom rules in Microsoft Dynamics CRM online.